Section 1
What ClipNamer does
ClipNamer is a Mac app that renames Pro Tools clip groups. It runs as a small floating window where you search the names you have already used, or type a new one. Every name you commit is saved, so the more you use ClipNamer the better its suggestions match the way you actually name things.
Make an edit selection, or select a clip you have already named. Press ⌘⇧L, type the start of what you are after, and ClipNamer brings up the closest matches. Press Enter and the clips are grouped and renamed in your session.
Track Rules
ClipNamer filters its naming depending on the track you have selected and what category that applies to.
When you click a track, ClipNamer matches the track's name against your track rules. A rule points at a category, and the category carries the naming convention: which prefix goes on the front, whether an episode number is appended, whether INT/EXT applies, and which pool of suggestions you see. A rule also picks a mode, which decides whether ClipNamer groups the clips before renaming them.
A track called FX 1 opens ready to write hard FX, and a track called BG 3
opens ready to write backgrounds, with different fields on screen and different
suggestions in the list.
If a track matches no rule, ClipNamer asks you once what it is and saves your answer as a new rule.
The convention is per category, not global
There is no single "ClipNamer name format". Each category defines its own, so one app covers hard FX, backgrounds, scene cuts, walla, spot, foley and loop group.
| You type | Category | You get |
|---|---|---|
Door Slam Wood |
HFX | HFX Door Slam Wood 101 |
Office |
BG | BG INT Office 101 |
Office |
SCENE | INT Office |
Footsteps Wood Hardwood |
FOLEY | Footsteps Wood Hardwood |
Therapy Office |
GROUP | GROUP Therapy Office |
The same typing produces a different name because the category is different. All of it is editable, and you can add categories of your own.
Suggestions improve over time
ClipNamer ships with a starter vocabulary of typical naming conventions for each category.
Two things feed the suggestion list. Your clip group folders: point ClipNamer at folders of clip groups you have exported from past Pro Tools sessions, and every filename in them becomes vocabulary, with the prefix and episode number stripped back off. And your commits: every name you confirm is saved and starts appearing in future sessions.
Ranking blends how well a name matches what you have typed, how often you use it, and how recently. The names you use most rise to the top within a session, so a common sound becomes a down-arrow and Enter.
Offline/Help
ClipNamer works entirely offline. Naming, suggestions and settings never need a network. The only thing that ever touches the internet is licence activation, and there is an offline route for that too.
The ? button in the naming window, or the ? key with the input empty, opens an in-app Help window covering the most-used parts of this guide.
Section 2
ClipNamer Startup
Installing
Open the disk image, drag ClipNamer to your Applications folder, and double-click it. One build covers Apple silicon and Intel, so there is nothing to choose.
The app is signed and notarized by Tone Tree LLC, so macOS opens it normally. If you have seen an instruction to right-click and choose Open because macOS "can't check the developer", that applied to an earlier build. You do not need it.
ClipNamer needs Pro Tools running with a session open. It talks to Pro Tools directly, so with no session open it cannot read the track or rename anything, and it will say so.
The permissions macOS asks for
macOS asks permission the first time ClipNamer does each of the things below. Click Allow or OK. If you decline, ClipNamer tells you which permission is missing rather than failing silently, and clicking the message opens the right pane of System Settings.
| Permission | Why ClipNamer needs it | Pane |
|---|---|---|
| Automation (controlling Pro Tools) | How clips get grouped and renamed. Required. | Privacy & Security › Automation |
| Accessibility | Only used as a fallback, on the rare commit where the fast path is unavailable and ClipNamer drives Pro Tools by keystroke. | Privacy & Security › Accessibility |
| Local Network | The Pro Tools connection is a local one, on this machine. Nothing is sent anywhere. | Privacy & Security › Local Network |
| Files and Folders | Only if you point ClipNamer at clip group folders kept in Desktop, Documents, Downloads or an external drive. | Privacy & Security › Files and Folders |
Two things worth knowing:
ClipNamer never writes to your clip group folders. It reads filenames and nothing else. Names you commit are saved inside ClipNamer's own data, not back into your folders.
Naming does not need the internet. Every feature except licence activation works with the machine fully offline.
Your first rename
- Select clips on whichever track you'd normally be naming, and press ⌘⇧L. ClipNamer reads the track name, lights the matching category and sets the mode. What each track gives you lists them.
- Type the start of a name. A grey preview of the likeliest match appears after the cursor and the list narrows.
- Tab accepts the preview, ↓ browses the list, or keep typing.
- Enter groups and renames the selection, returns focus to Pro Tools, and saves the name to your vocabulary.
On a track ClipNamer doesn't recognise it asks once and remembers your answer. See the unknown-track prompt.
Installing an update
Quit ClipNamer first, with ⌘Q or by right-clicking its Dock icon. Closing the naming window is not enough: ClipNamer keeps running in the background so the shortcut still works, and macOS will not replace a running app. Then open the new disk image and drag ClipNamer to Applications over the old copy. Your settings, folders and learned names carry over.
If you do replace it while it is running, ClipNamer carries on reading a file that has changed underneath it, and windows start showing the wrong contents: Help rendering code, Settings rendering the onboarding text. Nothing is damaged and nothing is lost.
The confusing part is that relaunching looks like it doesn't help. Double-clicking the new copy hands focus back to the broken instance that is still running rather than starting the new one. Quit ClipNamer properly first, with ⌘Q or from the menu-bar icon, and then launch it.
Section 3
The naming window
The small floating window you open with ⌘⇧L.
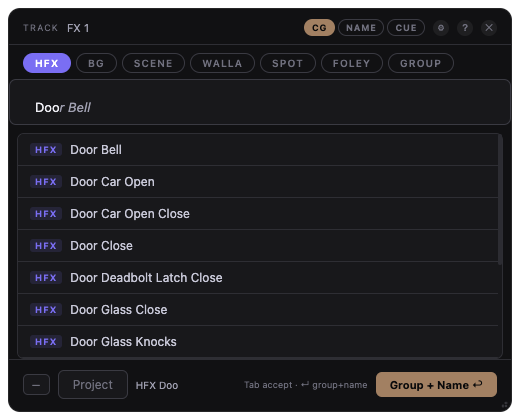
From top to bottom:
Title bar
| Element | Purpose |
|---|---|
| TRACK label + name | The Pro Tools track you're currently on. Updates as you click on different tracks. |
| CG / NAME / CUE pills | The active naming mode. A small dot on the active pill means the mode was picked automatically based on the track name. Click to override. |
| ⚙ Settings | Opens the Settings window, also ⌘,. |
| ? Help | Opens the Help window. |
| ✕ Close | Hides the window. Bring it back with the global shortcut. |
Category pills
A row of colored pills: HFX, BG, SCENE, WALLA, SPOT, FOLEY, GROUP by default. Click to select. The active pill controls which prefix is used and which pool of suggestions you see.
These seven are a starting point, not a fixed set. You can rename them, change their prefix and colour, reorder them, delete the ones you don't use, and add your own. See categories.
Keyboard: ⌘1 to ⌘7 select the first seven pills in the order they appear, so reordering them in Settings changes which key picks which. An eighth category and beyond can be clicked but has no shortcut. These work in every mode, matching the pills, which are clickable in every mode. Numeric keypad digits work as well as the top row.
INT/EXT row
Appears for categories that use scene-style naming, which by default are BG, SCENE, SPOT and WALLA. Two buttons, INT and EXT. Click to toggle.
ClipNamer often picks one for you based on words you type. See INT/EXT auto-pick.
Keyboard: ⌘I sets INT, ⌘E sets EXT, in CG and NAME mode wherever the row is on screen.
Composition row (GROUP only)
Appears only when the GROUP category is selected. Seven buttons: 1M, 1F, 2M, 2F, 3M, 3F, Group. Click one to include it in the saved name.
ClipNamer remembers your last comp pick per category.
Description input
Where you type. ClipNamer applies casing based on the ALL-CAPS Names preference in Settings › Setup:
- Off: title-case as you type (
Office Door Slam) - On: ALL CAPS as you type (
OFFICE DOOR SLAM)
As you type, a faint preview of the rest of the most likely suggestion appears after the cursor. See inline auto-complete.
↓ and ↑ browse suggestions. The input fills as you move. Esc leaves the list and puts back what you had typed.
Suggestion list
A scrollable list of names ranked by what's most likely useful. Click any suggestion, or press Enter on the focused one, to commit.
| Marker | Meaning |
|---|---|
| Small colored dot | This name was used in this session |
| Faded "starter" tag | This name comes from ClipNamer's bundled vocabulary, not your own folder |
Bottom bar
| Element | Purpose |
|---|---|
| Project picker (leftmost) | Switch between projects. |
| Project field | Your episode / reel / session identifier. Saved per project. Hidden for categories that don't carry an episode number. |
| Preview | Live preview of what will be saved when you press Enter. |
| Mode hint | Context-sensitive shortcut tip. |
| Group + Name ↩ (or Rename ↩) | Commits the current name. Same as pressing Enter. |
The bottom edge of the window is also where ClipNamer raises messages: the Pro Tools connection state, permission problems, folder problems, and the trial reminder. See troubleshooting.
Section 4
The three modes
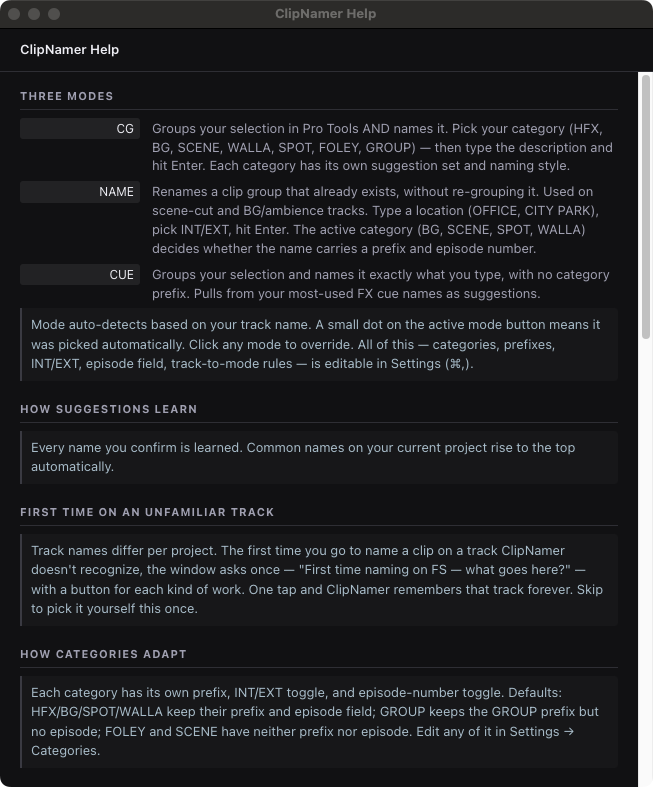
ClipNamer has three modes, shown as pills in the upper-right of the naming window. The mode decides one thing: whether your selection gets grouped before it is renamed.
| Mode | Grouping | Name is built from |
|---|---|---|
| CG | Groups the selection, then names it | the active category |
| NAME | No grouping. Renames what is already a clip group | the active category |
| CUE | Groups the selection, then names it | what you type, nothing else |
CG
For any clip you want grouped and named in one step. The name follows the active
category, so HFX gives HFX Door Slam Wood 101 and FOLEY gives Footsteps Wood Hardwood.
None of that is fixed. The prefix is a text field you can change or clear, the episode is a switch, and the order of the parts, the separator between them and any fixed text are all editable per category. See name format.
Enter groups and names. Shift+Enter renames only, for clips that are already grouped.
NAME
For clips that are already groups, on scene-cut, BG and ambience tracks. The name
follows the active category: BG gives BG INT Office 101, SCENE gives INT Office, SPOT gives SPOT INT Car 101, WALLA gives WALLA EXT Crowd 101.
The INT/EXT row is always visible, and ClipNamer picks one from the words you type.
Enter renames. Shift+Enter does the same.
CUE
For naming individual cues rather than scene beds. The name is just what you
typed, with no prefix, episode or INT/EXT: Door Slam Wood Hardwood. The default
CLIP and CUE track rules route here.
Enter groups and names.
How modes auto-pick
When you click on a track in Pro Tools, ClipNamer looks up the track name in your track rules. If a rule matches:
- The matching rule's category lights up in the category pills
- The matching rule's mode activates in the upper-right
- A small dot appears on the active mode pill to show it was auto-picked
If no rule matches, ClipNamer falls back to your Default Mode (Settings › Setup), and in CG a one-time prompt appears asking you to identify the track. Click any mode pill at any time to override the auto-pick.
Section 5
Categories
Categories control the naming style of your saved clips. ClipNamer ships with seven defaults; you can add, edit, or remove categories in Settings › Categories.
Default categories
| Category | Prefix | Episode | INT/EXT | Comp | Use for |
|---|---|---|---|---|---|
| HFX | HFX |
yes | no | no | Hard FX |
| BG | BG |
yes | yes | no | Background ambience |
| SCENE | (none) | no | yes | no | Scene-cut locations (INT Office) |
| WALLA | WALLA |
yes | yes | no | Crowd / restaurant / walla |
| SPOT | SPOT |
yes | yes | no | Spot effects |
| FOLEY | (none) | no | no | no | Foley cues |
| GROUP | GROUP |
no | no | yes | Loop-group cues |
Editing a category
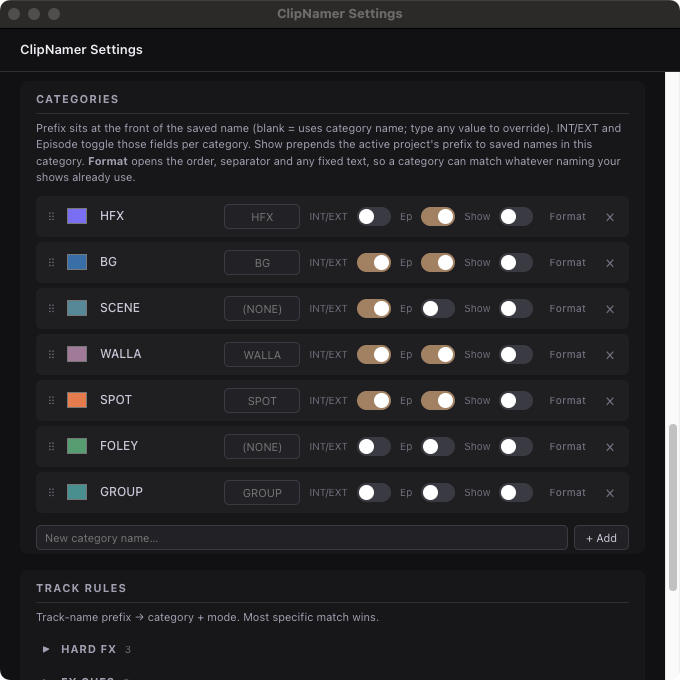
Each row has:
| Column | Purpose |
|---|---|
| ⠿ drag handle | Reorder. The order here matches the order of pills in the naming window and the order of ⌘1 to ⌘7. |
| Color | Pill color when this category is active. |
| Name | The pill label. Renaming updates any track rules that reference this category. |
| Prefix | The tag at the front of saved names. Blank with the category name as placeholder means it uses the category name. Blank with "(none)" placeholder means no prefix at all. Type any value to override. |
| INT/EXT | Show the INT/EXT row when this category is selected. |
| Ep | Include the episode-number field in saved names. |
| Show | Prepend the active project's prefix to saved names in this category. See using a project prefix. |
| Format | Order of the parts, the separator, and any fixed text. See name format. |
| × | Delete the category. A confirmation says how many track rules point at it, and ↩ Restore previous undoes it. |
Editing categories rebuilds the suggestion indexes, so a change takes effect immediately.
Name format
The defaults put the prefix at the front, the episode at the end and a space between everything. If your shows name differently, Format on any category row changes it.
| Control | What it does |
|---|---|
| The chips | Every part of the name, in the order it comes out. Drag to reorder. Click one to leave it out, which is the same switch as INT/EXT, Ep and Show on the row. |
| Fixed text | Text that always appears, for a reel tag or an M&E. Type it, click + Add, then drag it wherever it belongs. × on the chip removes it. |
| Separator | Space, underscore, hyphen or dot. It applies to the whole name, so an underscore gives HFX_Door_Slam_101, not HFX_Door Slam_101. |
| Reset format | Back to the default order and a space. |
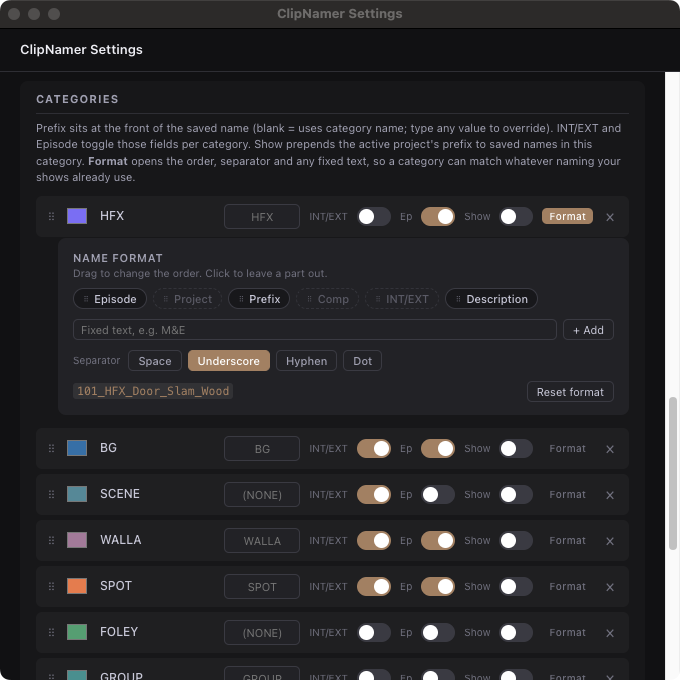
The line underneath is a live sample built the same way a real commit is, so it shows exactly what you will get.
A chip shown greyed with a dashed outline is switched off for this category and is left out of the name. Clicking it switches it back on.
Description can be reordered but not removed, since it is what you type. Prefix is set in the Prefix box on the row, not in this panel.
Some examples of what the same typing produces:
| Format | You get |
|---|---|
| Default | HFX Door Slam Wood 101 |
| Separator set to underscore | HFX_Door_Slam_Wood_101 |
| Episode dragged to the front | 101 HFX Door Slam Wood |
| Episode first, underscore | 101_HFX_Door_Slam_Wood |
Fixed text M&E added at the end |
HFX Door Slam Wood 101 M&E |
Changing the format does not rename anything you have already named. It only applies to names you commit from then on.
ClipNamer also reads these conventions when it scans your
clip group folders, so a library already named
101_HFX_Door_Slam is understood: the episode and the prefix are recognised as
structure and stripped, leaving Door Slam as vocabulary.
Adding a custom category
Settings › Categories, bottom row: type a name and click + Add.
The new category gets a gray color, no prefix, no INT/EXT and no episode by default. Configure those to taste.
Custom categories get suggestions exactly like the built-in ones. Names you commit accumulate straight away, and you can point a clip group folder at the category to seed it from past work.
The Show toggle
When ON, saved names in this category prepend the active project's prefix. For
example, with a project named LATE NIGHT carrying the prefix LN, the GROUP
category set to Show, a description of "Therapy Office" and comp 1F, the saved
name is LN GROUP 1F Therapy Office.
When OFF, which is the default, the project prefix is ignored for this category.
Section 6
Suggestions and auto-complete
Suggestions are ranked names that appear as you type, or, with an empty input, your most-used names.
Where they come from
For each category, ClipNamer pulls from three sources:
- Bundled vocabulary, a curated set of starter names per category, shipped with the app. Turn it off with the Built-in Vocabulary switch in Settings › Setup if you only want your own names.
- Your clip group folders, if you've added folders of past Pro Tools clip-group exports. Every filename contributes its name, with the category prefix and episode number stripped back off. See clip group folders.
- Auto-saved names, every name you commit, saved so your own vocabulary builds up as you work.
How ranking works
For a query, suggestions are ranked by:
- Match position, earlier matches rank higher
- Frequency, names that appear more often rise to the top
- Recency, a name you've used recently gets a bonus that halves every two weeks
With no query, names are ranked by frequency and recency alone.
Inline auto-complete
The faint grey text that appears after the cursor when ClipNamer thinks it knows what you're typing. While you type, if the top suggestion starts with your input, the rest of that suggestion appears inline.
| You typed | Top suggestion | Preview shown | Final after Tab |
|---|---|---|---|
Off |
Office |
Office |
Office |
City P |
City Park |
City Park |
City Park |
Accepting it:
| Key | Result |
|---|---|
| Tab | Accept the whole preview. If the preview equals the top suggestion, Tab also picks and commits in one keystroke. |
| → (right arrow at end of input) | Accept just the next word. Anywhere else in the input, the right arrow moves the cursor as normal. |
| Any other key | Continue typing. The preview re-renders if a new match exists. |
Auto-Complete Speed in Settings › Preferences sets how early the preview appears:
| Preset | Whole-line preview after | Next-word preview after |
|---|---|---|
| Conservative | 3 characters typed | 5 characters |
| Normal | 2 characters typed | 3 characters |
| Fast (default) | 1 character | 1 character |
Use Conservative if the preview feels distracting, Fast if you want it as early as possible. Inline Auto-Complete OFF in the same section turns the preview off entirely; use the arrow keys to browse suggestions instead.
INT/EXT auto-pick
In any scene-style category (BG, SCENE, SPOT, WALLA), as you type the description, ClipNamer checks each word against a built-in dictionary and auto-picks INT or EXT if a match is found.
| Keyword examples | Auto-pick |
|---|---|
| Office, Kitchen, Bedroom, Bathroom, Lobby, Hallway, Restaurant, Bar, Club, Theater | INT |
| Street, City, Park, Beach, Forest, Rain, Highway, Field, Plaza, Crowd | EXT |
If you click INT or EXT manually, your choice wins for the current clip. The override resets for the next clip.
In NAME mode, ClipNamer also remembers which INT/EXT you last committed each name
with. If you committed INT Office once, typing "Office" later auto-picks INT for
you. A manual click still wins for the next commit.
Section 7
Track Rules
How matching works
When you select a track in Pro Tools, ClipNamer checks every rule's prefix against
the start of the track name, case-insensitively. The longest matching prefix
wins: if you have rules for BG and BGM, a track named "BGM 1" matches BGM.
If two rules have identical prefixes, the first one in the list wins. To fix conflicts, delete or edit one of them.
Editing a rule
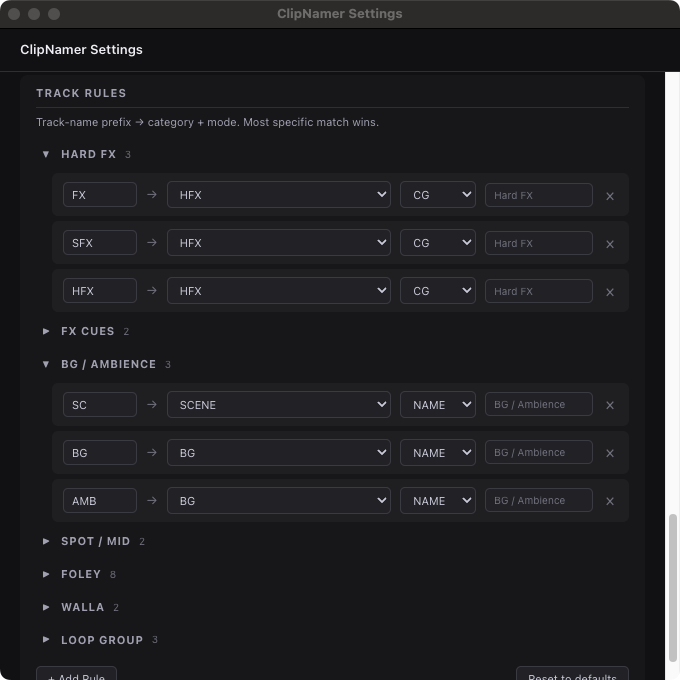
Settings › Track Rules. Rules are shown in collapsible groups. Each row has:
| Column | Purpose |
|---|---|
| Prefix | What the track name must start with. Case-insensitive. |
| → | Visual arrow. |
| Category | Which category pill lights up. |
| Mode | CG, NAME or CUE, which mode activates. |
| Group | Optional label for grouping related rules in this list. No behavioral effect. |
| × | Delete this rule. A ↩ Restore previous button appears after delete for one-step undo. |
Default rules
ClipNamer ships with 23 default rules:
| Prefix | Category | Mode | Group |
|---|---|---|---|
| FX, SFX, HFX | HFX | CG | Hard FX |
| CLIP, CUE | HFX | FX | FX Cues |
| SC | SCENE | BG | BG / Ambience |
| BG, AMB | BG | BG | BG / Ambience |
| SPOT, MID | SPOT | BG | SPOT / MID |
| FOLEY, FOL, FEET, FS, CLOTH, PROP, MOVE, HAND | FOLEY | CG | Foley |
| WALLA, CRWD | WALLA | BG | Walla |
| LOOP, GRP, LG | GROUP | CG | Loop Group |
Reset to defaults at the bottom of the Track Rules section restores these, and wipes any custom rules you've added.
The unknown-track prompt
When you open the naming window on a track that doesn't match any rule, and the mode is CG, a small prompt appears asking what kind of track this is:
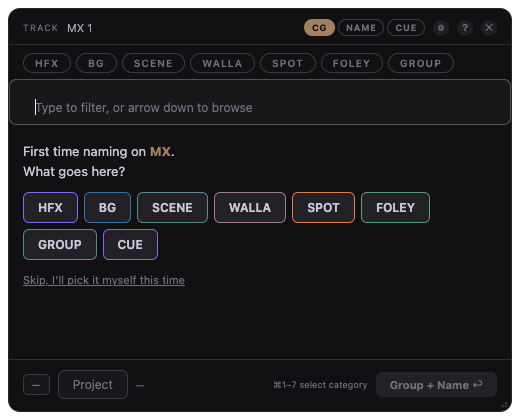
First time naming on TRACK_NAME. What goes here? [HFX] [BG] [SCENE] [WALLA] [SPOT] [FOLEY] [GROUP] [CUE] [Skip, I'll pick it myself this time]
Click any button to save a rule and proceed:
- The first seven buttons pick the corresponding category in that category's natural mode
- The CUE button maps to the HFX category in CUE mode, the cue-naming case
- Skip, or Esc, dismisses the prompt without saving. The prompt won't fire again for this track until you restart the app.
Saved rules appear under a "Learned" group in Settings › Track Rules.
Section 8
Projects and prefixes
A project remembers an episode number and an optional prefix. Useful when you work on multiple shows and need to keep their episode numbering separate, or when a show needs a custom prefix on saved names.
The picker
The leftmost button in the naming window's bottom bar. Shows — when no project
is active, or the project name when one is active.
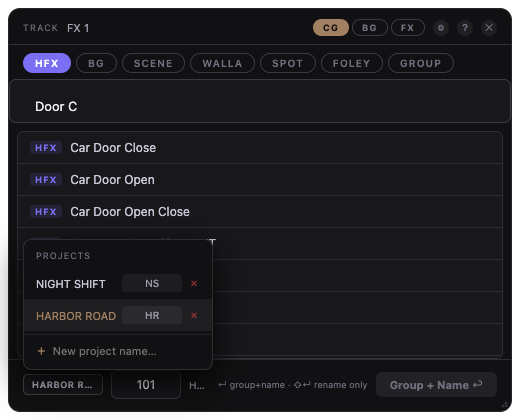
Click to open it. You'll see:
- Existing projects, click to switch active. The episode field updates to that project's saved episode.
- Prefix input next to each project, type a token to set this project's prefix. Saves as you type.
- × delete, remove a project.
- + input at the bottom, type a project name and press Enter to create.
Esc closes the picker without closing the naming window.
What's saved per project
| Field | Per-project | Global |
|---|---|---|
| Episode number | ✓ | |
| Prefix | ✓ | |
| Categories | ✓ | |
| Track rules | ✓ | |
| All other preferences | ✓ |
The stale-episode highlight
If your episode field has a value but you haven't touched it in 8+ hours, the field gets a subtle highlight to remind you to double-check. Type or click into the field to clear it.
Using a project prefix
Two steps:
- Set a prefix on the project in the picker, for example
LNfor "Late Night" - In Settings › Categories, flip the Show toggle ON for any category that should use the prefix
After that, naming a clip in that category prepends the project prefix:
LN GROUP 1F Therapy Office. Categories with the Show toggle OFF ignore the
prefix. When you switch projects, the prefix in saved names changes automatically.
Section 9
Clip group folders
Point ClipNamer at folders of clip groups you have exported from past Pro Tools sessions, and it knows how you name things from the start. This is where ClipNamer can really speed up the process, as it learns your previous naming conventions. It is optional, and ClipNamer works without it.
Settings › Setup › Clip Group Folders.
| Button | What it does |
|---|---|
| Add Folder… | Pick a folder and say what kind of work is in it. |
| Re-read | Rescan the folders, after you've exported more clip groups. Reports the per-category split of what it found. |
| Browse Names | List every name ClipNamer knows for a category, separated into bundled vocabulary and your own names. |
Each folder row also has Reveal, which opens that folder in Finder, and × to remove it. Removing a folder only stops ClipNamer reading it; the folder and its files are left alone.
Adding a folder
When you add a folder, ClipNamer asks what is in it. The folder's name only preselects an answer; when the name says nothing useful, Add stays disabled until you choose.
Your options are any of your categories, including ones you added yourself, or Mixed. Pick Mixed when a folder holds several kinds of work at once, and ClipNamer reads the category off each clip name instead of applying one to the whole folder. A folder filed under the wrong category puts the wrong names in your suggestions, which is why Add stays disabled until you answer.
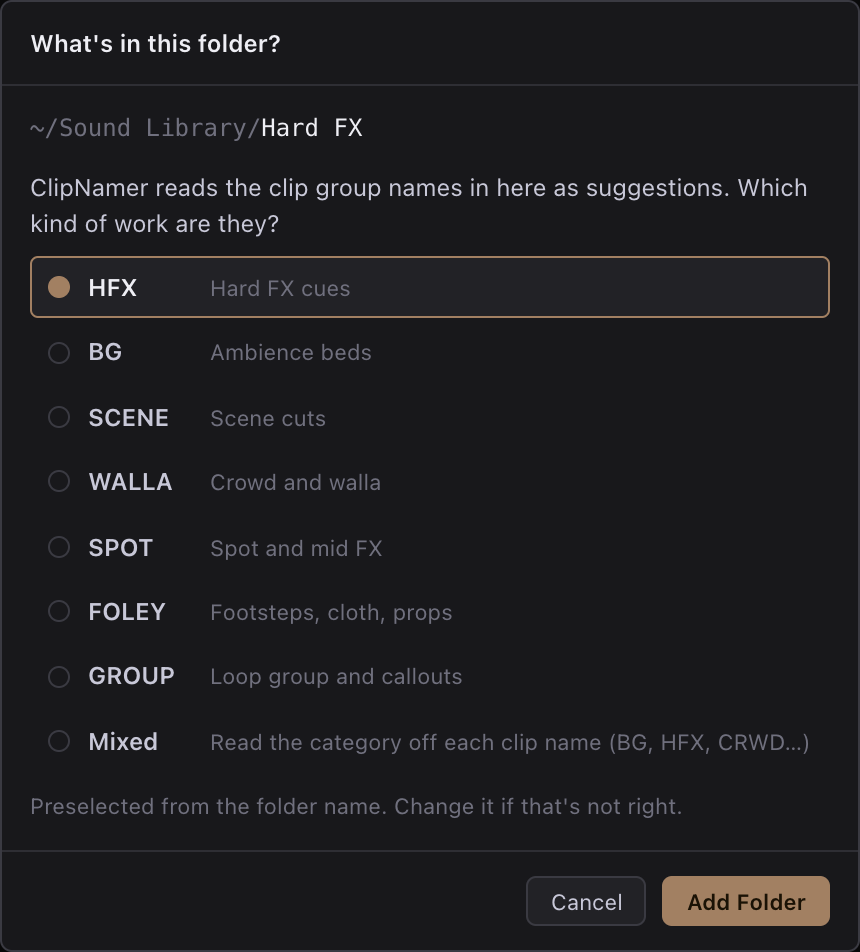
Subfolders are included, and a subfolder named after a department carries its category down the tree. Folders are only ever read, never written to.
Building the folders from past sessions
For the categories that use clip groups (HFX, BG, SCENE, SPOT, WALLA), about ten minutes per category gets you a real vocabulary.
Open a finished session with the work you want to draw on, select the clip groups, and File › Export › Selected Clip Groups… into a folder of their own. The menu name varies slightly by Pro Tools version. The export is fast because ClipNamer only ever reads the filenames, never the audio.
Repeat per category, one folder each, then add them under Settings › Clip Group Folders › Add Folder… and say what each one holds.
FOLEY and GROUP
Foley cues and loop-group cues usually aren't saved as Pro Tools clip groups in the first place. They are individual edited clips on dedicated tracks, so there is nothing to export the same way. For these, the bundled starter vocabulary gives you a useful base immediately, and names you commit are saved automatically, so your own naming builds up as you work.
If you do have an existing folder of foley or loop-group cue names, you can drop
those in manually. ClipNamer reads any .cgrp filename in the folder, and no real
audio is required.
Tips
- One folder per kind of work, unless you deliberately choose Mixed. It keeps suggestions clean.
- Re-use folders across shows. Over time each folder becomes your own reference library for that category.
- Add as you go. Every committed name is saved automatically, so the library keeps growing without more exports.
- Clean up legacy show codes if needed. If past exports baked a show code into
filenames, for example
LN HFX Door Slam, those appear in suggestions. Either rename or move those files in Finder, or use the project prefix going forward.
Section 10
The Settings window
Opens via the ⚙ button in the naming window, or ⌘,. Five sections: Setup, Preferences, License, Categories, Track Rules.
Setup
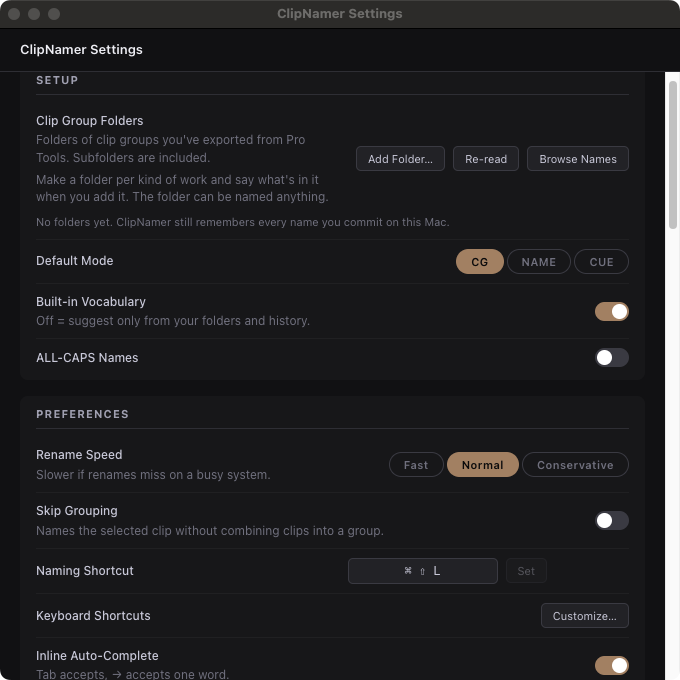
| Setting | Purpose |
|---|---|
| Clip Group Folders | Folders of past Pro Tools clip-group exports that feed your suggestions. See clip group folders. |
| Default Mode | CG, NAME or CUE. The mode the naming window opens in when no track rule matches. |
| Built-in Vocabulary | OFF means suggestions come only from your own folders and saved names, with no bundled words. Useful if the starter words get in the way of your own. |
| ALL-CAPS Names | ON uppercases saved names, OFF title-cases them. Applies to typing, suggestions, and saved names so they stay in sync. |
Preferences
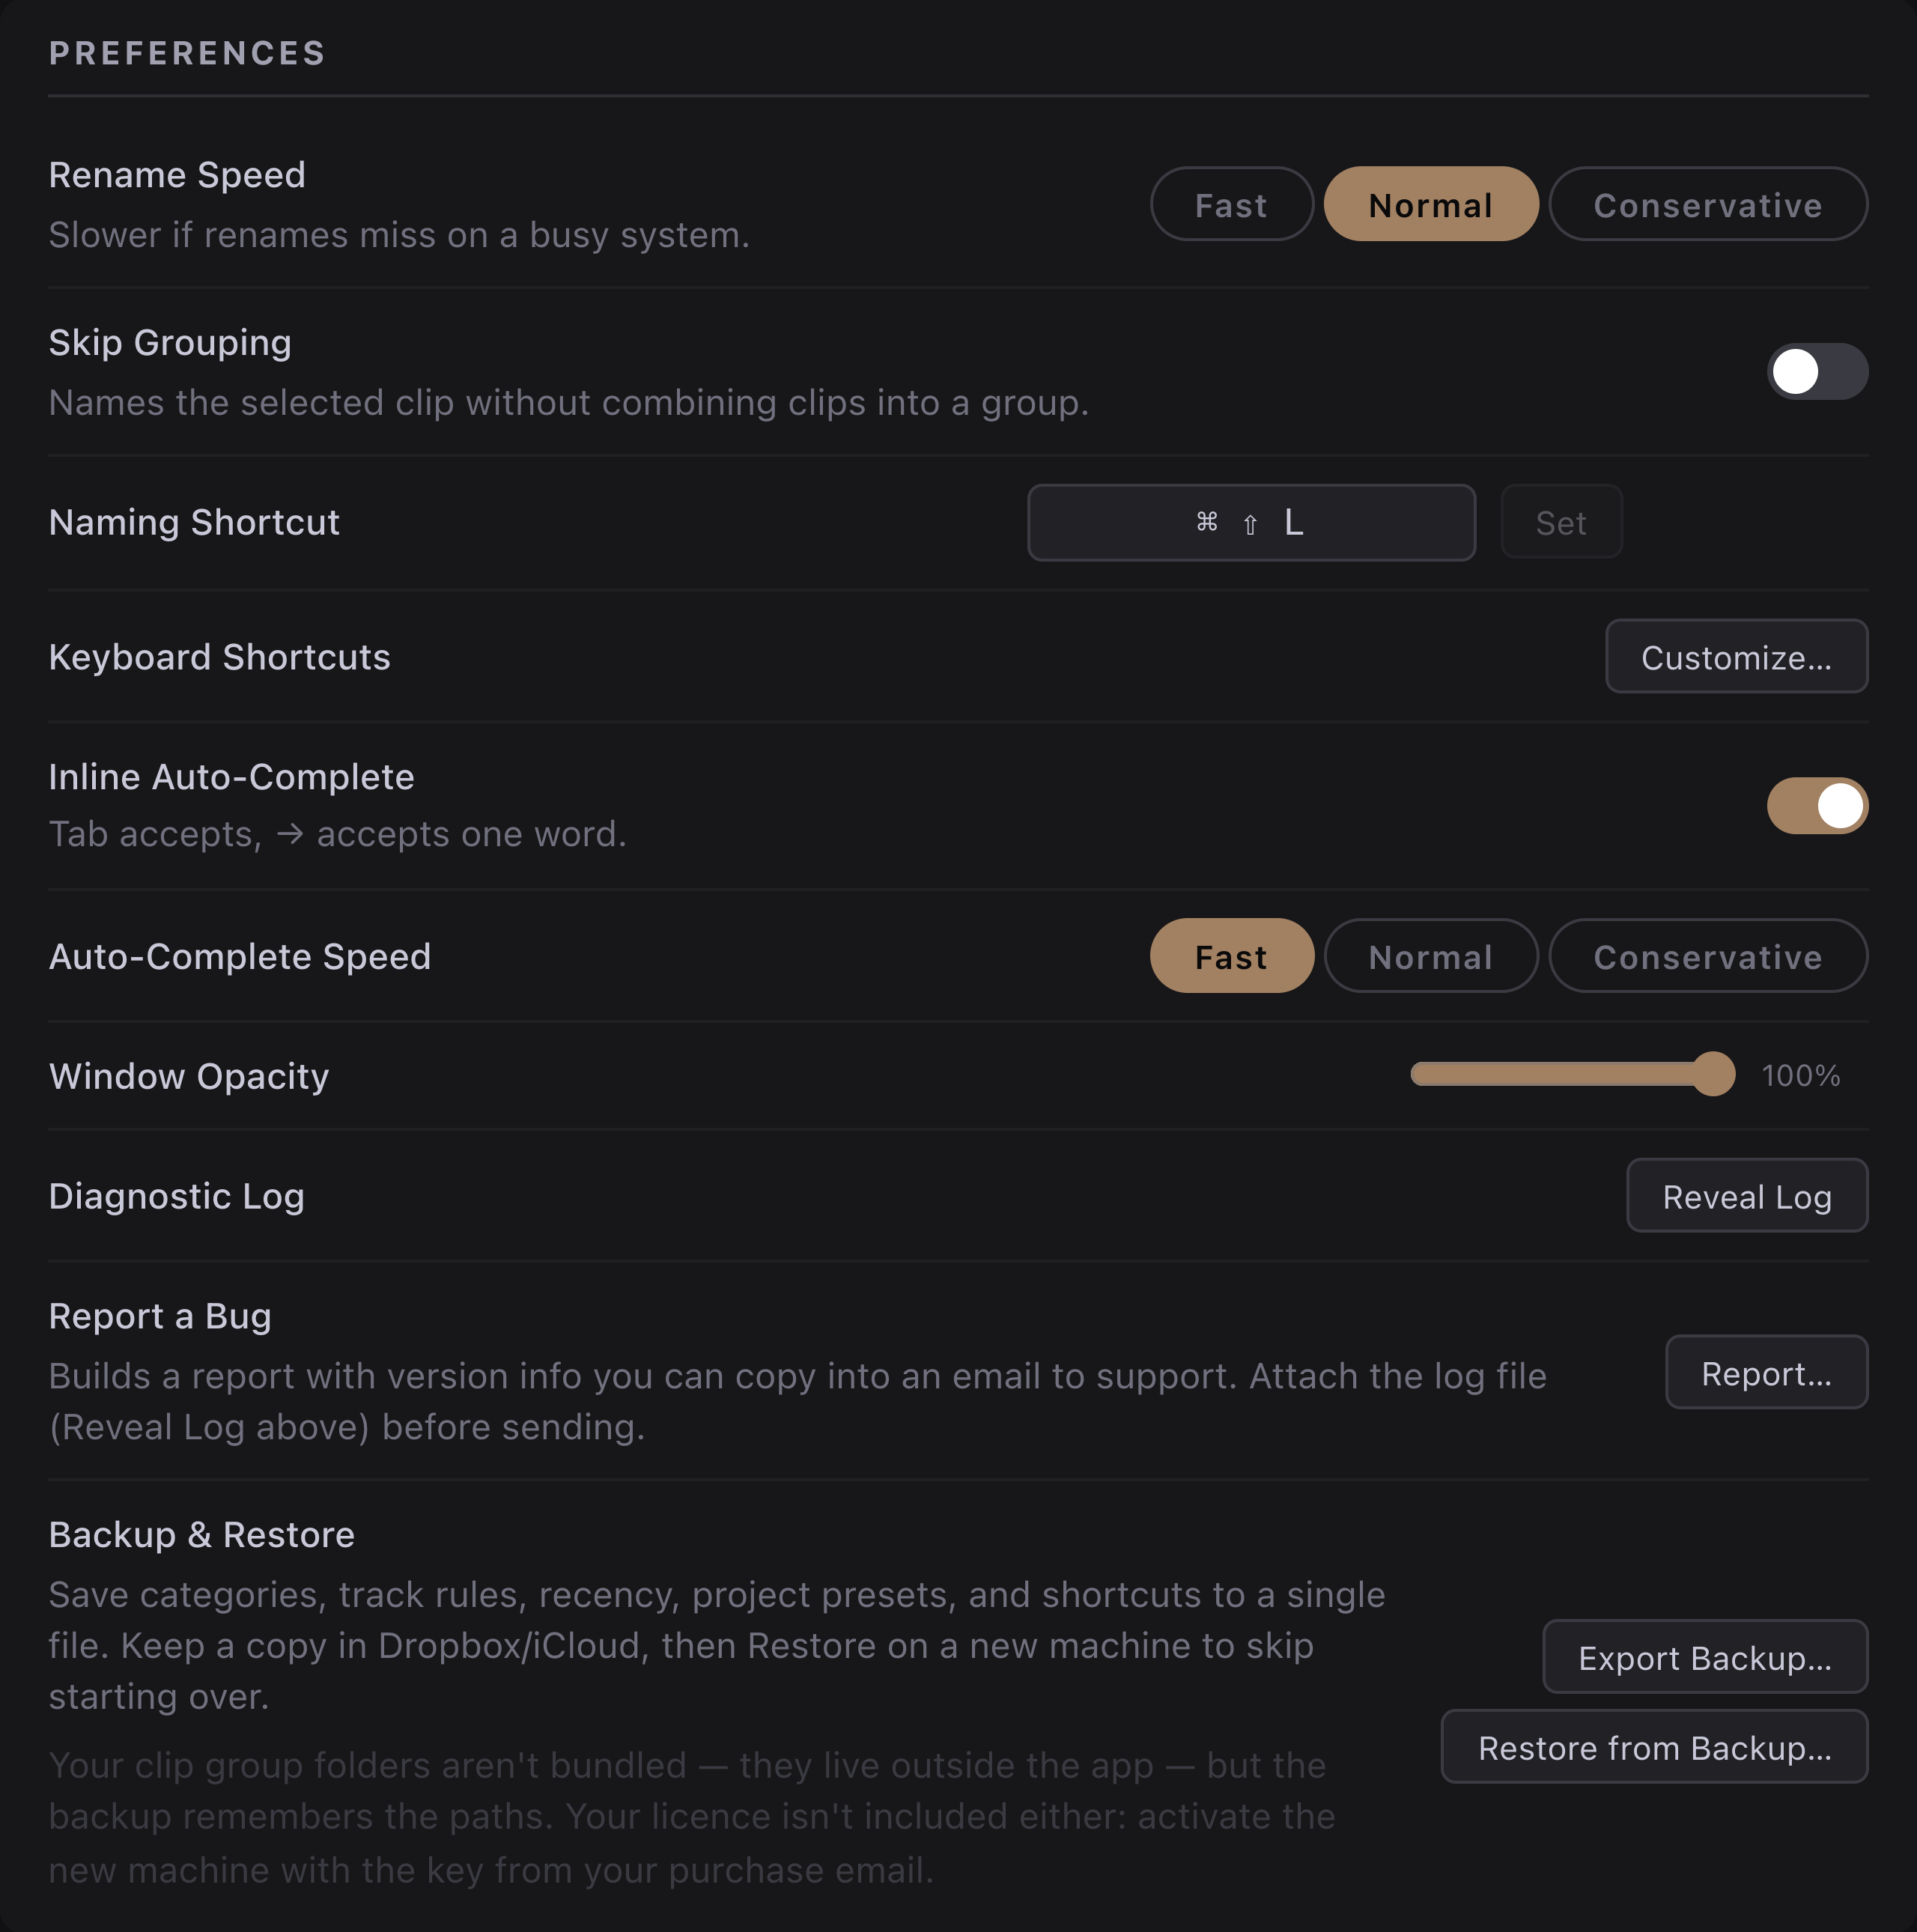
| Setting | Purpose |
|---|---|
| Rename Speed | Timing for the rename action. Use a slower setting if renames miss on a busy system. |
| Skip Grouping | Names the selected clip without first combining clips into a group. When on, Enter renames in place and the button label switches to Name ↩. |
| Naming Shortcut | The global shortcut that opens the naming window. Default ⌘⇧L. Click to capture a new combo. |
| Keyboard Shortcuts › Customize… | Opens the Shortcuts window. |
| Inline Auto-Complete | Toggle for the auto-complete preview. |
| Auto-Complete Speed | Conservative, Normal or Fast. |
| Window Opacity | 20% to 100% slider for the naming window. |
| Diagnostic Log › Reveal Log | Open the diagnostic log file in Finder. |
| Report a Bug › Report… | Opens a pre-filled report you can copy. See reporting a bug. |
| Backup & Restore | Export or restore your settings. See backing up your settings. |
License
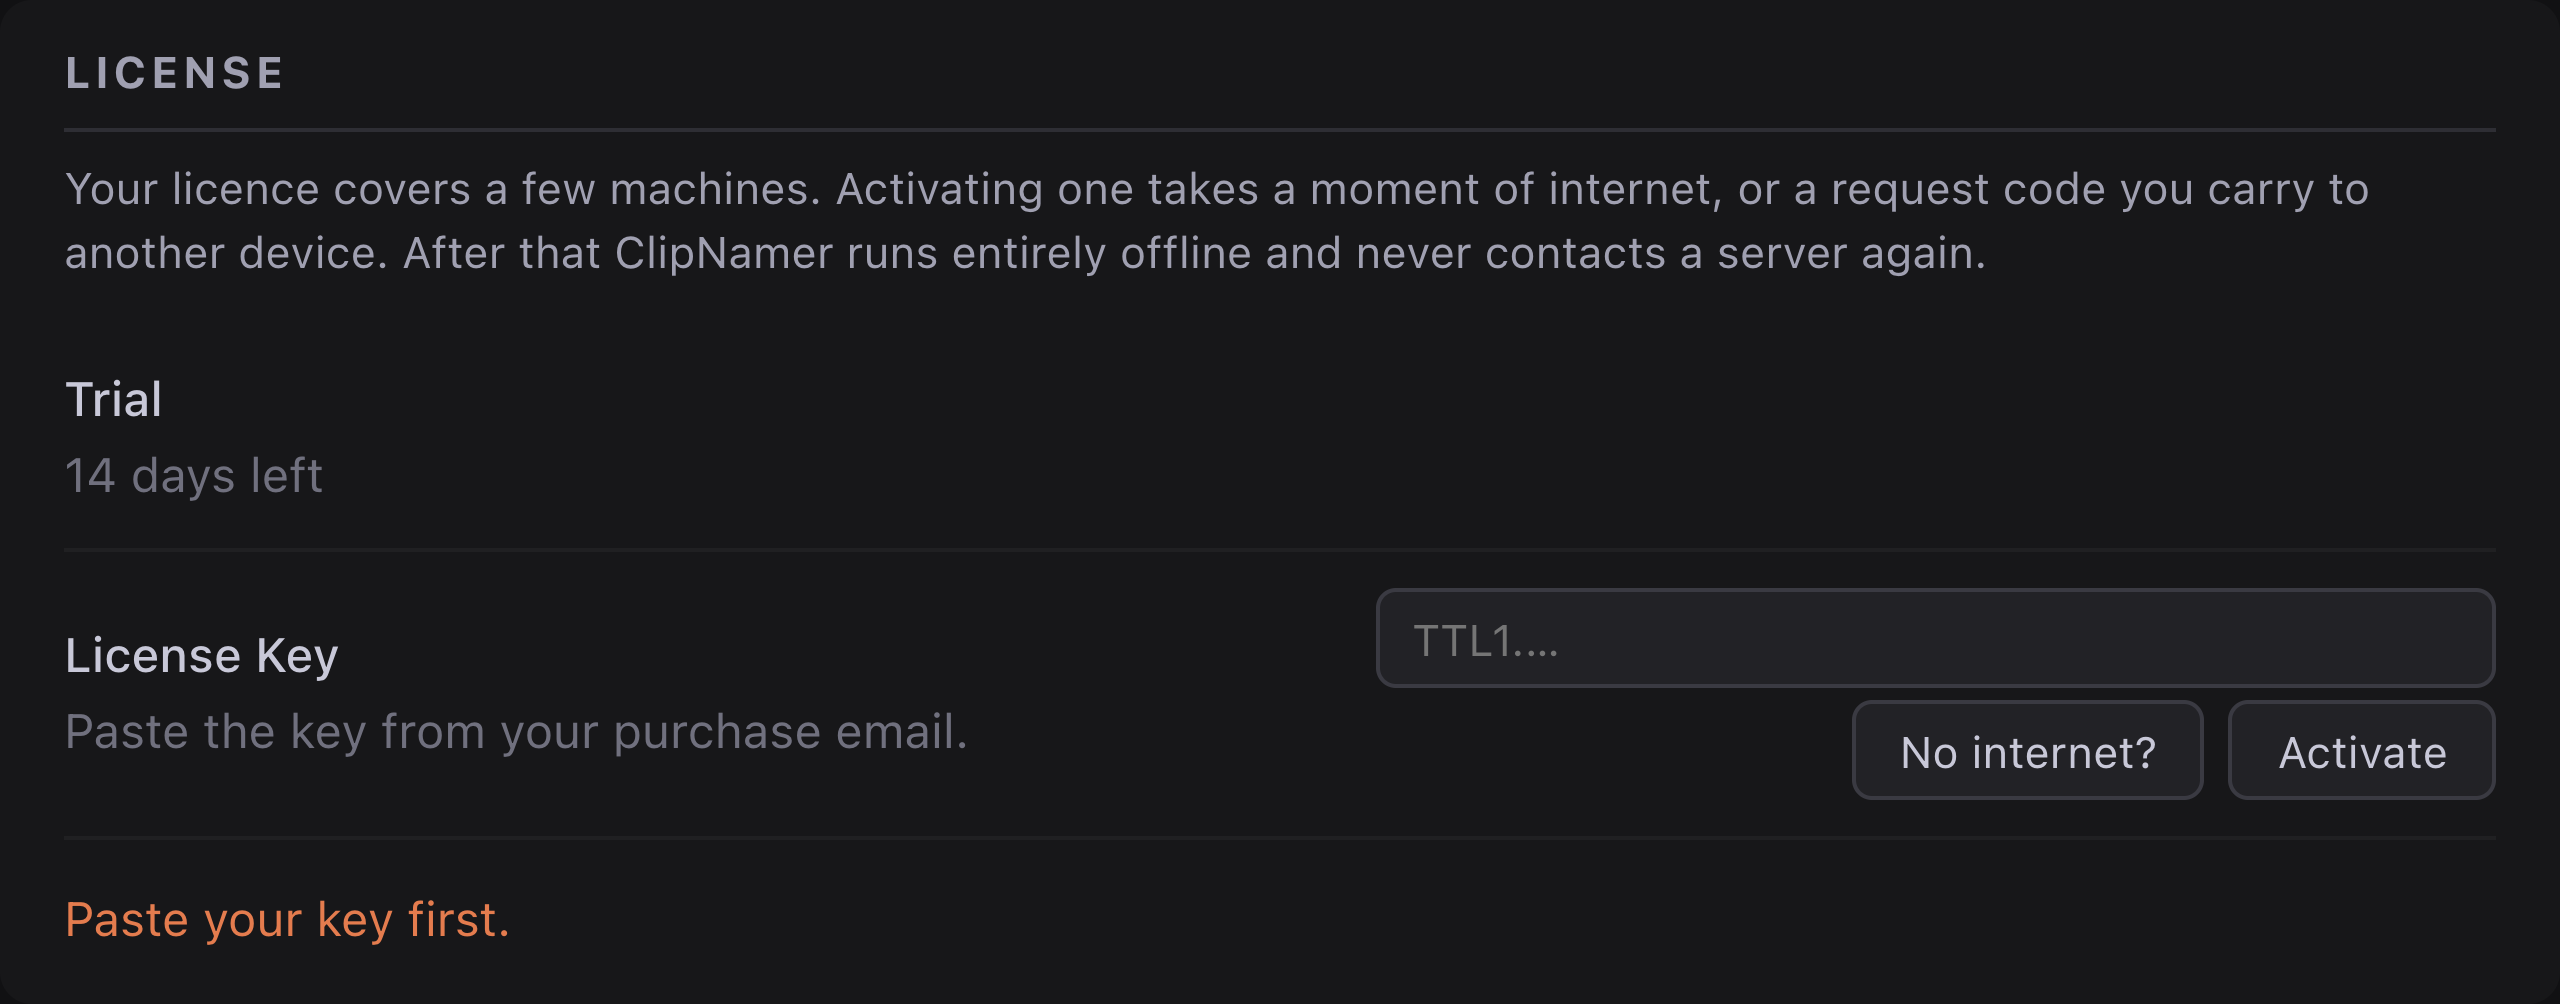
Your licence status, key entry, offline activation, and the list of machines using your licence. See licence and activation.
Categories and Track Rules
The full categories and track rules lists. Add new categories with the + Add input at the bottom, and new rules with + Add Rule. Format on a category row opens its name format.
Section 11
Keyboard shortcuts
Every key below is rebindable.
Global
| Shortcut | Action |
|---|---|
| ⌘⇧L | Show / hide the naming window from anywhere |
| ⌘, | Open Settings (when ClipNamer has focus) |
| ⌘? | Open Help (when ClipNamer has focus) |
Commit
| Shortcut | Action |
|---|---|
| ↵ Enter | Commit the typed name. CG groups and renames. NAME and CUE rename only. |
| ⇧↵ Shift+Enter | Commit alt. CG renames only, without grouping, for pre-grouped clips. NAME and CUE do the same as Enter. |
| ⇧R (input empty) | Re-use the last committed name. CG and CUE modes only. |
Suggestions
| Shortcut | Action |
|---|---|
| ↓ Arrow | Next suggestion (input fills as you move) |
| ↑ Arrow | Previous suggestion |
| Tab | Accept the auto-complete preview; if the preview equals the top suggestion, also pick and commit it |
| → Right arrow | Accept the next word of the preview (cursor must be at end of input) |
Modes and categories
| Shortcut | Action |
|---|---|
| ⌘1 to ⌘7 | Pick category 1 to 7, matching pill order. Works in all modes. |
| ⌘I | Set INT. CG and NAME modes, wherever the INT/EXT row is showing |
| ⌘E | Set EXT. CG and NAME modes, wherever the INT/EXT row is showing |
Utility
| Shortcut | Action |
|---|---|
| ? (input empty) | Open Help |
| Esc | Back out one layer: close the project picker, or leave the suggestion list and restore what you typed, or dismiss the unknown-track prompt, or close the window |
Rebinding a shortcut
Settings › Preferences › Keyboard Shortcuts › Customize… opens the Shortcuts window. It's a standalone window so you can keep the naming window open beside it for testing.
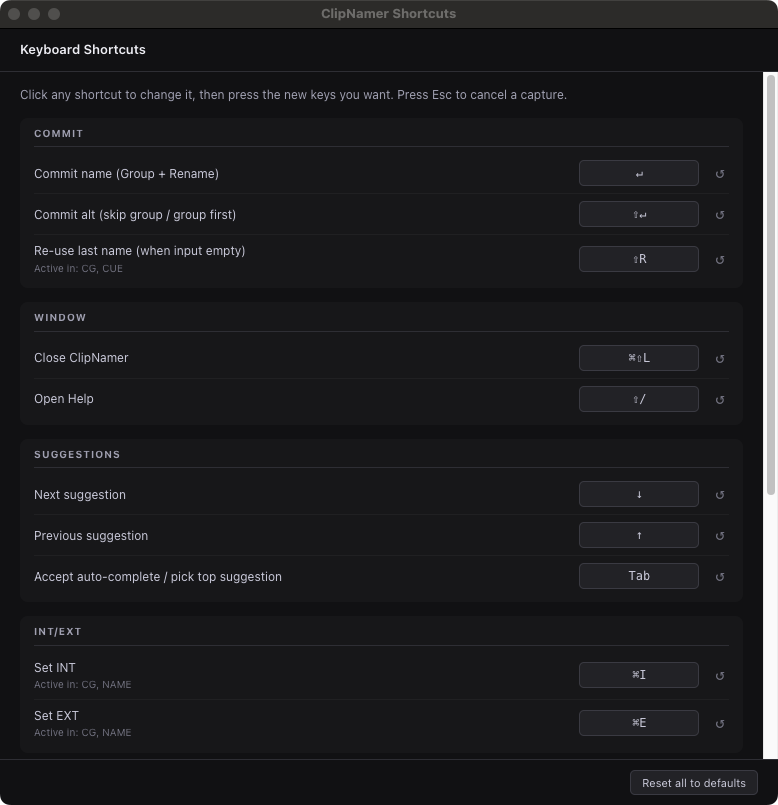
Each row shows a description, the contexts the shortcut fires in if it's restricted to some, the current key badge, and ↺ to reset that one shortcut to its default.
To rebind:
- Click any badge. It turns accent-colored and reads "Press keys…"
- Press your new key combo, including at least one of ⌘, ⌃, ⌥ or ⇧.
- If the new combo clashes with another shortcut, you'll see a warning and the capture cancels. Free up the clash and try again.
- On a clean capture, the binding saves immediately. A small "Saved" message appears at the bottom.
- The naming window picks up the change instantly, with no relaunch needed.
Numeric keypad digits can be bound and work correctly. Esc during capture cancels, and Esc closes the window. Reset all to defaults at the bottom wipes every custom binding.
Section 12
What each track gives you
With the default track rules, landing on a track picks the
category and mode for you. Episode 101 below comes from the project field, and
every result shown is the default format, which
you can change per category.
| Track name starts with | Category · mode | Type | You get |
|---|---|---|---|
FX, SFX, HFX |
HFX · CG | Door Slam Wood |
HFX Door Slam Wood 101 |
CLIP, CUE |
HFX · CUE | Door Slam Wood |
Door Slam Wood |
BG, AMB |
BG · NAME | Office |
BG INT Office 101 |
SC |
SCENE · NAME | Office |
INT Office |
SPOT, MID |
SPOT · NAME | Car |
SPOT INT Car 101 |
WALLA, CRWD |
WALLA · NAME | Crowd |
WALLA EXT Crowd 101 |
FOLEY, FOL, FEET, FS, CLOTH, PROP, MOVE, HAND |
FOLEY · CG | Footsteps Wood Hardwood |
Footsteps Wood Hardwood |
LOOP, GRP, LG |
GROUP · CG | Therapy Office |
GROUP Therapy Office |
In the scene-style categories, INT/EXT is picked from the words you type, so "Office" gives INT and "Park" gives EXT. In GROUP, the comp picker appears and your last pick is restored on the next clip.
Multiple shows
Add a project per show in the picker, bottom-left of the naming window, and set a prefix on each one if you need it. Episode numbers persist per project, so switching projects switches both. See projects.
Track names ClipNamer doesn't know
Either let it ask, and the unknown-track prompt saves your answer as a rule, or add it yourself under Settings › Track Rules › + Add Rule.
Section 13
Troubleshooting
Messages along the bottom of the window
ClipNamer raises messages along the bottom edge of the naming window rather than in dialogs, so they don't interrupt a naming pass. Most of them are clickable and take you straight to the fix.
| Message | What it means | What to do |
|---|---|---|
| "Pro Tools isn't running, or no session is open" | ClipNamer can't reach a Pro Tools session, so it can't read the track or rename anything. | Open Pro Tools with a session loaded. The message clears itself the moment a track reads successfully, so no restart is needed. |
| "Couldn't reach Pro Tools" | Pro Tools appears to be there but the connection failed. | Check Pro Tools is running with a session open. The diagnostic log has the detail. |
| "This build is missing its Pro Tools connection files" | The app install is incomplete. | Reinstall from the disk image, and please report it. |
| "macOS is blocking ClipNamer from controlling Pro Tools" | The Automation or Accessibility permission was declined. | Click the message. It opens the right System Settings pane. See permissions. |
| "Clip group folder not found" | A folder you added has moved or been renamed. | Click the message to open Settings, then re-point the folder. |
| A folder is present but unreadable | macOS privacy is blocking access rather than the folder being missing. | Click the message to open Privacy & Security › Files and Folders and switch ClipNamer on. |
| "Nothing was renamed, that selection isn't a clip group yet" | You used the skip-grouping commit on clips that haven't been grouped. | Press Enter instead, which groups and names in one step. |
| A write error | ClipNamer couldn't save a name to your folder, because of disk space or permissions. The message names the actual cause. | Fix what it names. The message clears on its own once writes succeed again. |
| Trial reminder | You are in the last five days of the trial. | Click it to open Settings and add a key, or click the × to hide it until tomorrow. See the trial. |
Common problems
The naming shortcut doesn't open the window. Another app is using ⌘⇧L. Open Settings › Preferences › Naming Shortcut, click the shortcut display, and press a new combo.
The wrong category lights up. A track rule is matching that you didn't expect, or no rule matches. Check Settings › Track Rules. Watch for two rules with the same prefix, where the first wins, or a longer-prefix rule overriding a shorter one.
Suggestions show names with an old project code. Your past clip-group exports baked the code into filenames, so it appears in suggestions. Either rename or move those files in Finder, or rely on the new names you save without it, especially if you use the project prefix going forward.
Suggestions from a folder stopped appearing. Either the folder moved, or macOS privacy is blocking it. ClipNamer tells these apart and says which in the message along the bottom.
A custom category shows no suggestions. Commit a few names in it and they will appear. To seed it from past work, add a clip group folder and pick that category when ClipNamer asks what the folder holds.
Rename appears to succeed but the clip name in Pro Tools doesn't change. Check the diagnostic log and forward the relevant entries to support.
The naming window is stuck or won't close. Press Esc, which backs out one layer at a time. Or press the global shortcut to toggle it hidden. If it's still stuck, quit ClipNamer from the menu-bar tray icon.
Replacing the app didn't seem to work. ClipNamer keeps running in the background after you close the naming window, and macOS won't replace a running app. Quit it fully with ⌘Q, or right-click its Dock icon and choose Quit, then drag the new copy across.
Reporting a bug
Settings › Preferences › Report a Bug › Report…
This opens a report with the ClipNamer version, your macOS version and prompts to fill in: "What happened?", "What did you expect?", "Steps to reproduce". Buttons let you Copy Report and Copy Address, so you can paste it into whichever mail client you use.
Send it to [email protected]. The most useful reports say what you did, what you expected, and what happened instead. Screen recordings are welcome.
The diagnostic log
Settings › Preferences › Diagnostic Log › Reveal Log
Opens the log file in Finder. The log records every rename attempt: what worked, what didn't, and why. Attaching it to a bug report is usually the difference between a fix and a guess.
Section 14
Licence and activation
ClipNamer is bought once, not subscribed. A licence covers a few machines.
The trial
ClipNamer runs a 14-day trial from first launch, with nothing held back.
Settings › License shows the days remaining. Over the last five days the naming window adds a reminder along the bottom; the × hides it until the next day so it can't interrupt you repeatedly during a session.
When the trial ends, the naming window shows a panel saying so and renaming stops. Nothing is deleted. Your folders, categories, track rules and learned names are all still there and come straight back when you activate.
Activating with a network connection
- Settings › License
- Paste the key from your purchase email into the License Key box. It starts
with
TTL1. - Click Activate.
That's it. ClipNamer contacts the licensing service once, claims a seat for this machine, and never contacts it again. If anything goes wrong, the message says what to do next rather than just reporting a failure.
Activating a machine with no internet
Editing computers are often locked off the internet, so there is a route that never puts the computer online. The offline Mac makes no network request at all.
Paste your licence key into the License Key box first, then click No internet?. The offline route needs the key in hand to build your request code, and it will say "Paste your key first" if you skip that. You do not click Activate; the key just needs to be in the box.
Then follow three steps:
- On a phone or any computer with internet, open the address shown. Buttons are provided to copy it or open it in a browser.
- That page asks for two things: your licence key, then the request code ClipNamer is showing. Both can be copied to the clipboard.
- Type the activation code the page gives you back into the box in ClipNamer and click Complete Activation. Capitals and hyphens don't matter.
While you are part-way through this, Settings shows "Activation needed". That is a normal state, not an error. It means your key is valid but this Mac hasn't claimed a seat yet. The trial clock keeps running underneath, so buying on day three doesn't lock you out while you walk a code out to your phone.
Managing your machines
Once activated, Settings › License shows a Machines list of the seats your licence is using.
- Refresh updates the list. It only asks when you click it, never on opening Settings, so an offline machine stays offline.
- Deactivate This Mac releases this machine's seat, for when you are retiring or reassigning a computer.
If the trial expires unexpectedly
ClipNamer voids a trial if the system clock moves backwards, which is how it avoids the clock being wound back to extend it. If you have corrected a badly wrong system date, get in touch and it can be sorted out.
Section 15
Backing up your settings
ClipNamer learns your categories, track rules, project presets, and which names you use most.
Exporting a backup
Settings › Preferences › Backup & Restore › Export Backup…
Saves one JSON file containing:
- Your categories and track rules
- Project presets and your last-used episode, INT/EXT and composition picks
- Recency data, meaning which names you've used most recently
- Keyboard shortcut overrides
- Window opacity, default mode, and other preferences
The file is small, typically under 100 KB, and safe to keep in Dropbox, iCloud Drive, or anywhere you back up other documents.
Two things are deliberately left out. Your clip group folders aren't bundled, because they live outside the app and survive a reinstall on their own; the backup remembers their paths so ClipNamer can re-find them. And your licence key and machine identity are not included, so a backup file is safe to sync and restoring one can't overwrite the licence on the machine you restore to. Activate a new machine with the key from your purchase email.
A good cadence: export once a week, or any time you add a batch of new categories or track rules.
Restoring on a new machine
After installing ClipNamer on a new machine, or after a reinstall on the same one:
- Settings › Preferences › Backup & Restore › Restore from Backup…
- Pick your saved JSON
- Confirm the warning dialog
Settings repaints in place, so your categories and track rules appear straight away.
If any clip group folders no longer resolve at the saved paths, because you moved them or you're on a different machine, the status line says how many are missing. Re-add them under Setup.
What ClipNamer does on its own
Every time ClipNamer starts up, it makes a snapshot of its settings and keeps up to 7 generations of them. If a bug ever corrupts the live settings file, ClipNamer recovers from the most recent good snapshot automatically and you wouldn't usually notice. This runs silently.
A manual backup protects against bigger events: drive failure, factory reset, moving machines.
Backups don't include clip group files
Your .cgrp files are Pro Tools exports living in the folders you chose under
Settings › Setup. They aren't inside ClipNamer's data directory and aren't part
of the backup file. Back them up with the rest of your Pro Tools work.
The names ClipNamer has learned are a different thing and are in the backup, under recency data. Restoring on a new machine brings them with you.
ClipNamer 0.1.0-beta.6 · © 2026 Tone Tree LLC · All rights reserved [email protected]